¶ The Quilter 101 Mini Reverb Head
¶ IMPORTANT SAFETY INSTRUCTIONS
1 – Read and keep these instructions.
2 – Heed all warnings and follow all instructions.
3 – WARNING: To prevent fire or electric shock, do not expose this equipment to rain or moisture. Do not use this apparatus near water.
4 – Clean only with a dry cloth.
5 – WARNING: To prevent excessive temperature rise, operate product only in free air with unrestricted ventilation. Do not install in confined spaces or near heat sources such as radiators, heat registers, stoves, or other apparatus that produce heat.
6 – Do not defeat the safety purpose of the polarized or grounding-type plug. A polarized plug has two blades with one wider than the other. A grounding type plug has two blades and a grounding prong. The wide blade or third prong are provided for your safety. If the provided plug does not fit your outlet, consult an electrician for the replacement of the obsolete outlet.
7 – Protect the power cord from being walked on or pinched, particularly plugs, convenience receptacles, and the point where they exit from the apparatus.
8 – Unplug the apparatus during lightning storms or when unused for long periods of time.
9 – The appliance coupler (or attachment plug) is the mains disconnect device and should remain readily accessible when amplifier is in use.
10 – Refer all servicing to qualified service personnel. Servicing is required when the apparatus has been damaged in any way, such as power-supply cord or plug is damaged, liquid has been spilled or objects have fallen into the apparatus, the apparatus has been exposed to rain or moisture, does not operate normally, or has been dropped.
11 – This device complies with Part 15 of the FCC Rules. Operation is subject to the following two conditions: (1) this device may not cause harmful interference, and (2) this device must accept any interference received, including interference that may cause undesired operation.
12 – Changes or modifications made by the user that are not expressly approved by the manufacturer may void your authority to operate the amplifier.
CAUTION: TO REDUCE THE RISK OF ELECTRIC SHOCK, DO NOT REMOVE THE COVER. NO USER-SERVICEABLE PARTS INSIDE. REFER SERVICING TO QUALIFIED PERSONNEL.
WARNING: To prevent fire or electric shock, do not expose this equipment to rain or moisture.
¶ A great foundation for the modern guitarist
The 101 Mini Reverb head provides a rich assortment of boutique-quality tones for home use and recording, coupled with enough power to use on stage. It provides an ideal link between pedals, recording effects, and any good guitar speaker. In many ways, it serves as a good introductory course covering the full range of possibilities inherent in the electric guitar. It may be “mini” in size, but it’s packed with seven of the most-popular controls to serve the modern musician. This little powerhouse can also serve as a backup for almost any stage amp.
The high impedance INPUT accepts normal guitar cables and maximizes the tone of guitar pickups. The GAIN control ranges from clean to overdrive. The LIMITER progressively replaces normal overdrive distortion with smooth sustain. A traditional 3-BAND EQ couples the familiar sound of the classic “tone stack” with an active MID control for greater range. The REVERB expands your sound stage with a nicely voiced wash of smooth decay. The MASTER control adjusts the overdrive threshold of the amplifier from 0 to 50 watts, offering clean headroom and/or rich overdrive at will. The EFFECTS LOOP provides an ideal place to connect “sweeteners” such as delay or chorus, adding their tone to the overall sound of the amp, including its overdrive. The Effects Send also provides a line-out signal, and the HEADPHONE jack provides private listening as well as an alternate line-level output. Dual SPEAKER jacks on the back drive any normal speaker with a warm, musical response, and the amp is stable with no speaker connected.
Please consult the rest of this manual to obtain the best results from all these features.
¶ A NOTE FROM PAT QUILTER:
Our goal at Quilter Labs is to bring you all the tone and dynamics of the best vintage amplifiers without the weight and drawbacks of tube technology. Despite its small size, this is a fully professional product, produced on a world-class production line. May your new amplifier deliver many years of faithful service and become a source of inspiration and creativity.
Quick review of how the electric guitar came to be a great instrument.
All well-established musical instruments share a natural property of the human voice – the tendency to become brighter as effort and volume increases. A good singer’s voice becomes more “brilliant” or “ringing” at high volumes, and the natural acoustic instruments we all enjoy behave the same. They develop more overtones or harmonics as you push them harder. This provides an expressive quality that we can all relate to. Breath-driven instruments (horns) and bowed instruments (violin) inherently produce more harmonics with higher volumes, and even the piano develops more “clang” as you play harder. However, plucked instruments such as the guitar are a little less expressive in this respect. They get louder when plucked harder, but once plucked, the overtones are fairly similar at loud and soft levels.
The basic concept of a hand-held instrument with a fretted neck using relatively few strings to produce many notes has many practical advantages which explain its popularity. You can play complex chords and melody lines in many keys, you can bend notes, and you can move around and sing while playing. However, acoustic guitars get lost in a large band, and notes quickly die away, which initially limited the guitar to a barely audible rhythm instrument in large bands.
Electronic amplification using vacuum tubes became practical in the 1920’s, and it did not take long for innovators to think about amplifying the acoustic guitar. The early experimenters just wanted to make the acoustic guitar “as loud as any piano”, but the first practical technology used coil-type pickups and primitive low-fi amplifiers which gave the electric guitar a distinctively round and “bloopy” tone. Purists did not embrace this “artificial” tone, but Hawaiian steel-guitar players, followed by country players, and finally early jazz guitarists awakened to the possibilities of the new sound. History was made. Even today, the round fat tone of these early rigs is accepted as the classic “jazz guitar” tone. Electric guitar pioneers such as Charlie Christian learned to play bluesy runs and extended jazz chords, at a volume level that competed with horns and drums.
¶ GUITAR AMPLIFICATION 101
All well-established musical instruments share a natural property of the human voice – the tendency to become brighter as effort and volume increases. A good singer’s voice becomes more “brilliant” or “ringing” at high volumes, and the natural acoustic instruments we all enjoy behave the same. They develop more overtones or harmonics as you push them harder. This provides an expressive quality that we can all relate to. Breath-driven instruments (horns) and bowed instruments (violin) inherently produce more harmonics with higher volumes, and even the piano develops more “clang” as you play harder. However, plucked instruments such as the guitar are a little less expressive in this respect. They get louder when plucked harder, but once plucked, the overtones are fairly similar at loud and soft levels.
The basic concept of a hand-held instrument with a fretted neck using relatively few strings to produce many notes has many practical advantages which explain its popularity. You can play complex chords and melody lines in many keys, you can bend notes, and you can move around and sing while playing. However, acoustic guitars get lost in a large band, and notes quickly die away, which initially limited the guitar to a barely audible rhythm instrument in large bands.
Electronic amplification using vacuum tubes became practical in the 1920’s, and it did not take long for innovators to think about amplifying the acoustic guitar. The early experimenters just wanted to make the acoustic guitar “as loud as any piano”, but the first practical technology used coil-type pickups and primitive low-fi amplifiers which gave the electric guitar a distinctively round and “bloopy” tone. Purists did not embrace this “artificial” tone, but Hawaiian steel-guitar players, followed by country players, and finally early jazz guitarists awakened to the possibilities of the new sound. History was made. Even today, the round fat tone of these early rigs is accepted as the classic “jazz guitar” tone. Electric guitar pioneers such as Charlie Christian learned to play bluesy runs and extended jazz chords, at a volume level that competed with horns and drums.
Early guitar amps were generally underpowered, and it was easy to push them to the point of breakup or distortion. Again, the purists considered this a “defect” but more intuitive musicians began to discover new tonal possibilities. For instance, Bob Wills and his Texas Playboys were audibly rocking out by the late 30’s, even in the studio, pushing their amps well into overdrive to create a musically exciting sound to energize big dance halls. They instinctively realized that pushing their guitars into overdrive created harmonics similar to the sound of a hot saxophone or trumpet. Chords played at these volumes sounded rather muddled, but thanks to certain fortuitous properties of these early amps, the right type of chord could still ring loud and clear, and the resulting sound became associated with high-energy electric guitar. By the 1950’s, hot players such as Chuck Berry were using brighter, more powerful amps to put out as much sound as a big swing band, combining dynamic vocals with bold brassy power chords, backed by a small combo with bass, drums, and an almost drowned-out piano.
It was quickly noticed that hollow-body electric guitars tended to resonate when too close to the loudspeaker, producing a runaway howling tone called “feedback”. This too was considered a defect, and inventors such as Les Paul and Leo Fender developed solid-body guitars to reduce feedback and increase string sustain. The mid-to-late 1960’s saw rapidly increasing overdrive levels and development of early fuzz pedals, and musicians discovered that with enough gain, even solid body guitars would feed back. But they also discovered that the feedback could be controlled, and pioneers such as Jeff Beck, Jimi Hendrix, and Eric Clapton learned to “tame the beast” and produce controlled feedback sustain. This provided the final missing link in the guitar’s capabilities. Today, a modern electric guitarist with a good amp can generate sweet clear tones, aggressive harmonics, and even prolonged sustained notes at will.
Once the guitar was routinely amplified, additional effects such as tremolo and reverb augmented the available tone colors and allowed studio performance to have a “big hall” sound. Modern amps typically include Effects Loops for easily adding effects.
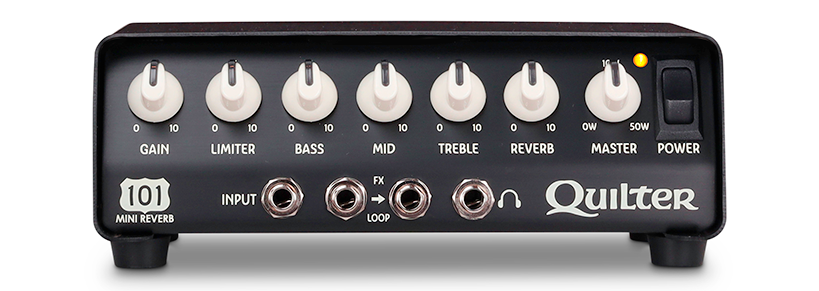
¶ FRONT PANEL FEATURES
¶ INPUT
Accepts standard guitar or any other signal. An extra high input impedance optimizes the sound of your guitar pickups.
¶ GAIN
Determines how hard the amp “pushes” into overdrive. Depending on the volume of your guitar pickups and playing attack, the sound should remain clean from 0 to 3, and breakup should begin to set in between 3 and 5. Settings above 7 should result in increasing amounts of overdrive and sustain.
¶ LIMITER
This technology was originally developed to prevent radio stations and recordings from being over-modulated by loud peaks, which causes overdrive distortion. The limiter is a “phantom hand” on the gain control that monitors output level and reduces the gain just enough to prevent overdrive, and then restores gain as the note dies away. This preserves the sustain you get with high Gain settings while reducing the usual breakup. The LIMITER knob sets the threshold for this action. On zero, nothing stops normal breakup. At about 3, the limiting threshold is above the breakup threshold, so you can moderate overdrive to a “rolling boil”. From 5 to 10, the threshold progressively moves below the breakup limit, and you will increasingly feel the gain “pulling back” before it hits distortion. The limiter still has some “give” to preserve musical dynamics, so it can still be overdriven with enough Gain, but you will sense a much wider “sweet spot” of sustain.
¶ THREE-BAND EQ SECTION
The BASS and TREBLE controls use classic “tone stack” circuitry which has become strongly associated with the “sound” of the electric guitar. The MID control uses active cut-boost circuitry for much greater range than the traditional “tone stack” Mid control.
• Begin with the EQ controls on “5” to produce a comfortable starting point that suits most instruments quite well.
• The BASS control adds low frequencies from 0 to 8, and then subtracts some midrange from 8 to 10 to create more contrast between high and low frequencies.
• The MID control cuts and boosts frequencies in the middle of the guitar range. Below 5, the control progressively “scoops” midrange which creates a leaner crisper tone, often used for rhythm playing. Above 5, the control boosts midrange which tends to produce more overdrive.
• The TREBLE control progressively adds high frequencies from 0 to 10, which get progressively “fatter” as well as louder as the control advances.
All of these settings are fairly interactive, so be sure to systematically explore the full range of each control to understand what it does to the tone.
¶ REVERB
The same digital IC used in other Quilter products is voiced to resemble the classic “spring reverb tank” without its bulk and mechanical instability. Reverb is progressively added from 0 to 5, and the dry signal is reduced somewhat from 5 to 10, to produce a wetter “drenched in reverb” balance without excessive volume increase.
¶ MASTER
This control regulates the overall loudness or power level of the amplifier, without changing the tone established by the other controls. For general convenience, wattage markings are shown from 0 to 50 watts, which should align with tube amps having similar wattage ratings. The actual power will depend somewhat on speaker characteristics so the markings are only a guideline.
The primary mission of the Quilter amplifier program is to deliver the same rich, warm sound of the best vintage amps, with the same incisive and controllable overdrive breakup, in a convenient modern package with “no tubes required”. At all MASTER settings, you should experience the same overdrive “feel” and responsiveness as good boutique amps. However, since feedback and sustain depend on reaching a high enough volume to resonate your guitar body, you may have to use higher MASTER settings and a good speaker to get these effects, and these loud tones have a direct physical impact on the musician which is part of the rock-music experience. The overdrive will tend to “settle down” at lower MASTER settings, but you will still get the same dynamic response to your picking attack. Due to psycho-acoustic effects, the ear tends to hear overdrive at very low volumes as an artificial effect, so it is a good idea to initially explore overdrive with Master on 50% or higher. Once you have heard how the amp “stretches out” at a physically exciting volume level, you will have a better feel for the sound of the overdrive at low Master volumes.
¶ EFFECTS LOOP
A rich assortment of pedals is half the fun of modern guitar playing, and the 101 is designed to optimize the performance of your pedal collection.
• The middle jack to the right of the Input sends a 1V signal to external effects. “Sweeteners” such as chorus, delay, and reverb pedals will work very well here, since their sound will be cleanly overlaid on the overall sound of the amp, including any overdrive. For example, establish a nice overdrive sound and then listen to the wonderful waterfalls of sound that a delay pedal overlays when using the Effects Loop. The final signal in the effect chain should be returned to the right hand jack. When you insert the Return plug, the internal “flow through” connection is interrupted and the signal now flows through the effects and back to the amp
• Distortion or overdrive pedals should be used between the guitar and the amplifier input, so that the amp’s tone shaping can be applied to their sound. Effects pedals can be used before the amp input as well, but their sound will become increasingly buried under heavy amplifier overdrive.
¶ HEADPHONE JACK
The small outlet to the right of the FX LOOP will drive standard headphones to fairly loud levels, so we recommend you keep the Master below half. Since full range headphones will reproduce much more sizzle than standard guitar speakers, there is a gentle high frequency rolloff in the Headphone signal to “take the edge off”.
Using the headphone jack does not mute the speaker. It is OK to unplug the speaker, when using headphones only.
¶ REAR PANEL FEATURES
The 101 can provide enough output to burn out low power speakers, especially those built as exact re-issues of vintage 15-30W speakers. For safer results, use the MASTER to select a wattage limit that is equal or less than the speaker being used.
The 101 Mini Reverb works with all known worldwide AC voltages (100-250V), which allows you to play just about anywhere on the planet.
Plug the power cord that comes with your amplifier into the AC inlet on the rear. Any 3-prong IEC cord may also be used with the amplifier. Always ensure that the ground contact is intact on both the cord and receptacle.
Connect a single 8 or 16-ohm speaker to the lower jack, 8-OHMS.
Connect a single 4-ohm speaker to the upper jack, marked 4-OHMS.
For two 8-ohm speakers, or any other mix of impedances, plug one into each jack. Power will divide between the two speakers. The amplifier will not be bothered by impedance mismatches, so if the tone sounds OK, go for it!
¶ Caring For Your Amplifier
Clean the outer surfaces with a clean, damp cloth or vacuum with a soft brush. Never use any abrasives, harsh cleaners or solvents.
The 101 amplifier is manufactured with high quality components using modern industrial processes that greatly reduce production defects. Each amplifier goes through an intensive testing process before it leaves the factory ensuring that your amplifiers will give you years of flawless service. There are no user-serviceable parts inside the amplifier. Any repairs should be performed by a trained service professional.
Always use the amplifier in a well-ventilated environment and protect from external heat sources such as furnaces or direct sunlight.
Prolonged high-volume playing causes heat buildup in the speaker which reduces its working lifetime. If you find it necessary to consistently use the amp at full volume, we recommend using a larger speaker, or extension speaker, to prolong speaker life and improve sound coverage.
Be sure to check out Quilter Labs' deluxe carrying case. Designed to fit all of Quilter's block type amplifier heads, they are the perfect solution to protect your investment.
¶ SPECIFICATIONS:
| Amplifier Module Specifications | |
| Power Output: | 0 to 50 watts maximum, 4-8 ohms |
| AC Power Req.: | 100–240Vac, 50–60 Hz, 100 W maximum |
| Input Connections: | ¼" mono, 2M input impedance, 2V peak. |
| Effects Send: | ¼” mono, 1V full scale, 600 ohms. |
| Effects Return: | ¼” mono, 1V full scale, 47K |
| Headphone Output: | 1/4" jack, 4V peak. |
| Speaker 1 Output: | 8 ohms, 60-100 W recommended rating |
| Speaker 2 Output: | 4 ohms, 60-100 W recommended rating |
| Dual Speakers 1+2: | 8 ohms each, 30-50W recommended rating. |
| DIMENSIONS | |
| H x W x D: | 8.5”(218mm) x 7.5” (190mm) x 3” (76mm) |
| Weight: | 4.5 lbs (2kg) |
¶ TROUBLESHOOTING:
Circuitry used in Quilter amplifiers is stable and there are no internal connections that might go bad. Generally, the amp works normally, or it doesn’t pass a signal at all, or in rare cases noises or dropouts occur due to cracked parts. Movable parts such as controls and inputs can be damaged or corroded, but these faults are usually apparent when cycling controls or re-inserting inputs. Most faults are traced to external causes such as cables, speakers, or instruments. The following troubleshooting chart should help narrow down the cause.
| Symptom | Action | |
| No power, no lights | • Ensure that the AC cord is fully seated and connected to a live source. • Check the AC source by trying another device. |
|
| Amp shuts off then after a short time, turns back on | • If amp feels very hot, thermal protection is activating. Reduce Master at least 30% and keep the amplifier out of direct sunlight or enclosed spaces. Amp normally runs only slightly warm. • Continued intermittent behavior indicates need for servicing. |
|
| Pilot light is on, but no sound (using a guitar) | • Confirm that the MASTER control and the GAIN controls are both turned up. • Ensure the guitar plug is fully seated at each end. • Try using a different guitar cable. • Check that the pickup selector switch and volume on the guitar are set correctly. • Try a different instrument or audio device. • Ensure that the rear panel speaker plug is fully inserted into the SPEAKER jack. • Try headphones, to see if the speaker is bad. |
|
| Weak or fluctuating audio | • Plug guitar directly into amp and unplug the FX Loop to isolate bad pedals. Check connections and power supply or batteries in pedal board. • The amplifier almost never “loses power” without completely stopping. Look for external causes. |
|
| Background hum | • Ensure the guitar plug is fully inserted. • Try using a different guitar cable. Make sure it is properly shielded. • Any AC powered sources or effects should be plugged into the same receptacle or AC strip as the amplifier to help avoid ground loops. If the hum goes away when you turn down the guitar: • Single coil pickups can pick up hum, especially from light dimmers or neon lights. Some guitars have “phase switching” pickup selectors that can sometimes help. • Check that the guitar’s cavities are well shielded. • A thin “buzz” especially at partial guitar volume may indicate that the AC cord’s ground pin has been defeated. This is dangerous and leads to noise. |
|
| Excessive noise | • At high gain settings, some audible hiss or whoosh is normal. • Check your cables, guitar and other effects in the signal chain, especially for hum or buzz. • “Chattering” and other recurring noises are usually caused by cellphones close to the guitar or amp. |
|
| Amp sounds garbled at all volumes | • Try a different speaker, especially if headphones sound clear. Caution: reduce MASTER volume until sound level has been confirmed. • Try plugging instrument directly into the amp, and unplugging Effects Loop. If sound is then clean, check outboard processing for problems. |
|
| Weak or fluctuating audio | • Plug guitar directly into amp and unplug the FX Loop to isolate bad pedals. Check connections and power supply or batteries in pedal board. • The amplifier almost never “loses power” without completely stopping. Look for external causes. |
|
| Desire clean tone, getting too much overdrive distortion | • Turn down the GAIN control and turn up MASTER. • Confirm that speakers are in good condition. |
|
| Desire overdrive tone, not getting enough overdrive | • Turn down MASTER and increase GAIN until the desired overdrive is obtained, then reset MASTER to desired loudness. • Turn up guitar volume. • Try higher output pickups. • More MID will promote overdrive. |
|
| Amplifier Requires Service | If any of the events below occur, immediately unplug the amplifier and refer to a service technician. • Amplifier or AC cord emits smoke • Amplifier is dropped or chassis is dented or bent • Liquid has been spilled into the amplifier • Loose parts inside the amplifier are heard • AC breaker trips |
¶ WARRANTY & SERVICE:
For warranty and service information, visit our support website at support.quilterlabs.com
¶ FCC NOTICE:
Note: This equipment has been tested and found to comply with the limits for a Class B digital device, pursuant to part 15 of the FCC Rules. These limits are designed to provide reasonable protection against harmful interference in a residential installation. This equipment generates, uses, and can radiate radio frequency energy and, if not installed and used in accordance with the instructions, may cause harmful interference to radio communications. However, there is no guarantee that interference will not occur in a particular installation. If this equipment does cause harmful interference to radio or television reception, which can be determined by turning the equipment off and on, the user is encouraged to try to correct the interference by one or more of the following measures
• Reorient or relocate the receiving antenna.
• Increase the separation between the equipment and receiver
• Connect the product into an outlet on a circuit different from that to which the receiver is connected.
• Consult the dealer or an experienced radio/TV technician for help.