¶ Neunaber ILLUMINE Reverb
¶ KEY FEATURES
• 17 stereo reverb effects
• 50 user presets
• MIDI input and thru/out with simple controller
• Powerful and flexible expression control engine
• Analog dry signal path
• Pedalboard-friendly design with rear connectors and low power usage
¶ QUICK START
¶ CONNECTORS
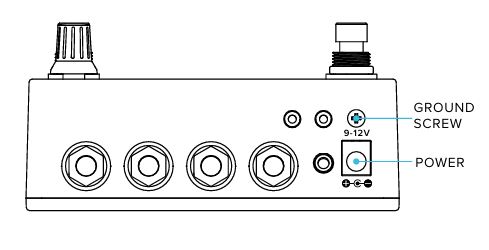
¶ POWER
Power is supplied with a standard pedal power supply:
• 9 V to 12 V regulated DC
• 100 mA or greater
• center-negative (tip-negative) barrel connector, 5.5 mm OD x 2.1 mm ID
¶ Grounding
The screw next to the power connector connects to chassis ground. In cases where the entire rig “floats” (does not connect to earth ground through an amp, audio interface or mixer), this screw may be used to connect a ground wire. Make sure this screw is securely fastened, and do not use ILLUMINE with this screw removed or loose.
Do not use a power supply greater than 12 V DC.
Use only a linear regulated power supply.
¶ SIGNAL INPUT / OUTPUT
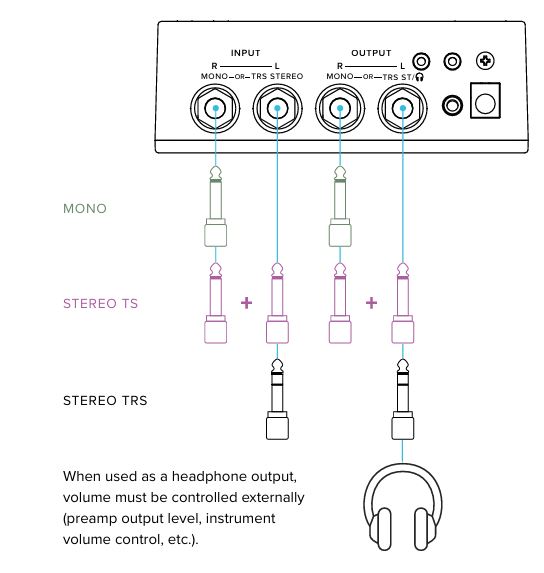
A mono input can be connected with a stereo output, or a stereo input can be connected with a mono output, in which case the two channels will be summed.
¶ EXPRESSION INPUT / OUTPUT
A 3.5 mm (⅛”) TRS Expression input may be used to connect an expression pedal or volume pedal with the appropriate cable. Only TRS connections (not TS) are supported.

A 3.5 mm-to-¼” adapter is required to connect a standard expression pedal.
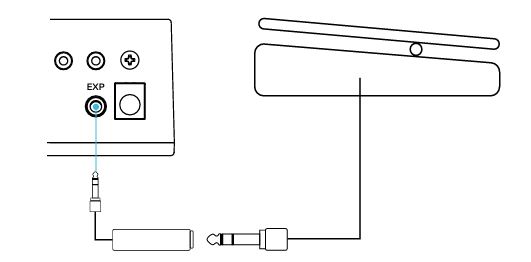
To connect a volume pedal, use a 3.5 mm to dual ¼” TS (stereo breakout) cable, such as a Hosa CMP-153. Connect as follows:
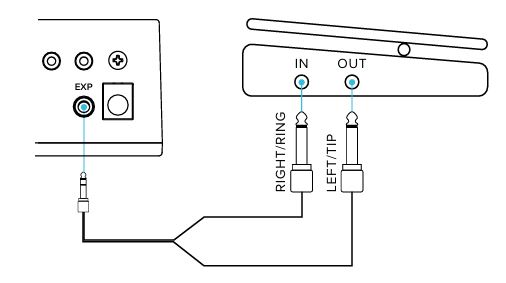
The volume pedal must be passive (unpowered).
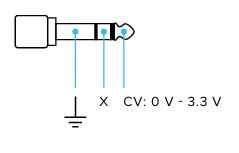
The EXP input may be driven with a 0 V - 3.3 V control voltage (CV). Use only a TRS connector, and leave the ring contact unconnected.
¶ MIDI
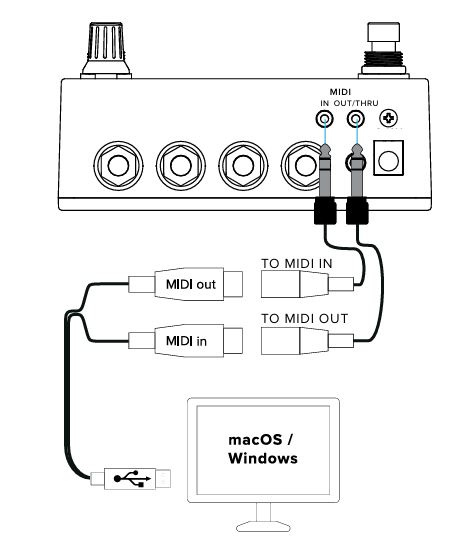
MIDI connects using two 2.5 mm TRS jacks. Adapter cables are required for connecting 5-pin circular DIN plugs. These connectors are wired according to MIDI’s recommendation (Type A) as follows:
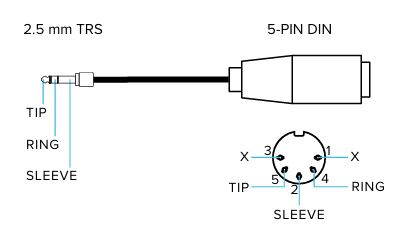
The MIDI INPUT is isolated and may be used in a daisy-chain connection.
The MIDI OUTPUT may be configured as either a hardware THRU or an OUTPUT:
• When configured as THRU, the MIDI INPUT is echoed to THRU with no latency.
• When configured as OUTPUT, the MIDI INPUT is not echoed. In this case, ILLUMINE functions as a simple controller and sends program change and control change messages.
For detailed information, see the MIDI section of this User Guide.
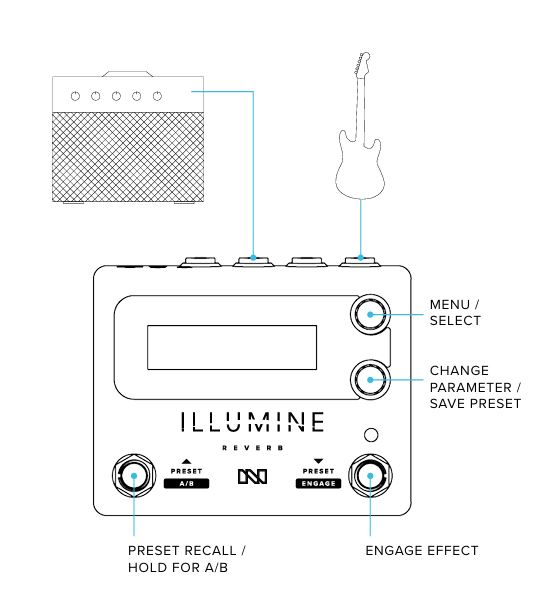
¶ USER INTERFACE

¶ KNOBS
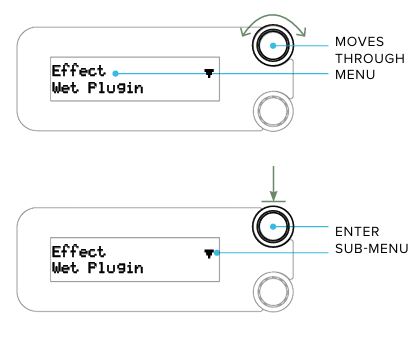
In general terms, the top knob navigates through the menu, and the bottom knob changes the currently displayed item.
¶ Top Knob
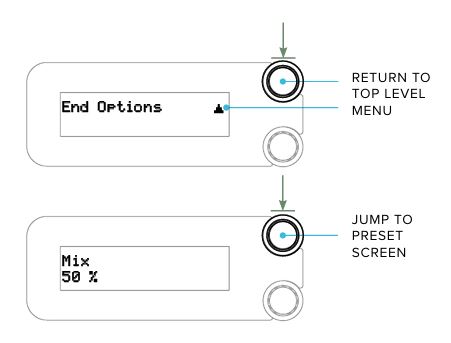
Turning the top knob moves through the current menu. If a sub-menu is available, ▼ is displayed on the right of the top line. Pressing the knob enters this sub-menu.
If ▲ is displayed, pressing the top knob returns to the top-level menu. When the arrow is not displayed, pressing the top knob will jump to the PRESET screen.
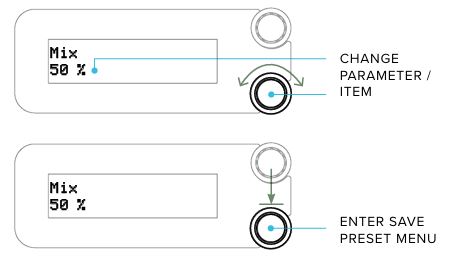
¶ Bottom Knob
Turning the bottom knob changes the displayed parameter or item. In the top-level menu, pressing the bottom knob enters the Save Preset menu.
When ▼ is displayed on the right of the bottom line, pressing the bottom knob will invoke the currently displayed selection.

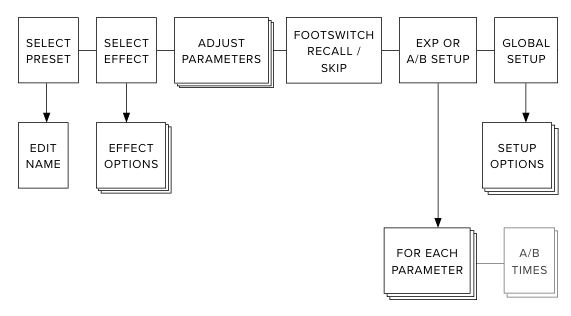
¶ Menu Map
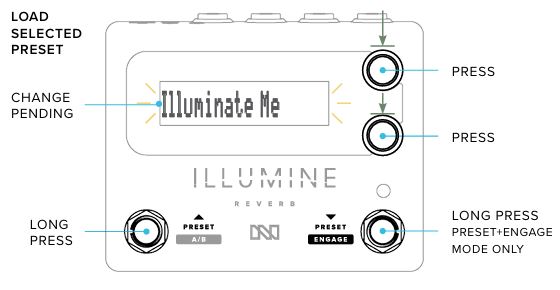
¶ FOOTSWITCHES
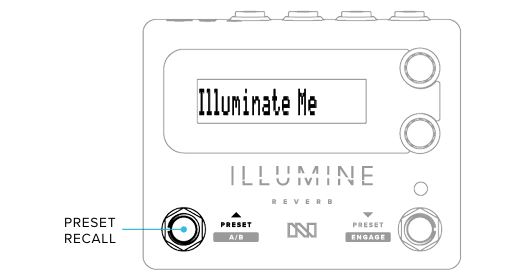
The left-side footswitch cycles up to the next preset in the Footswitch Recall list. Presets are added/removed from this list from the “FOOTSWITCH” screen in the top menu.
Recalling a preset from the left footswitch displays the preset name in double-high characters for easier viewing at a distance.
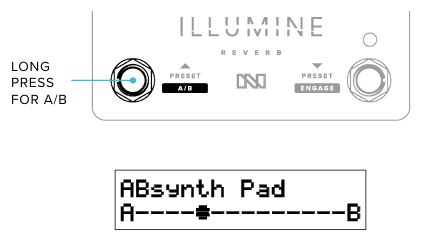
A long-press (>650 ms) of the left footswitch toggles between A and B parameter sets, if the A/B switch is selected as the Expression Input (see Expression Control Engine).

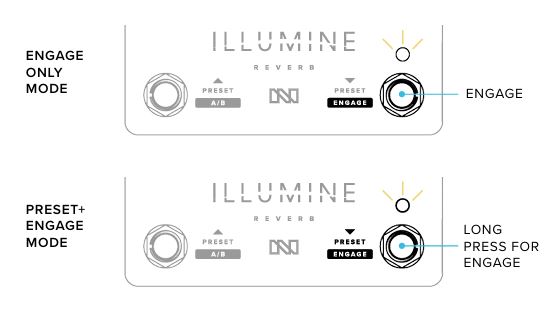
The function of the right-side footswitch depends on the RIGHT FOOTSWITCH configuration in the GLOBAL SETUP menu (see Right Footswitch):
• Engage-only mode — the right footswitch toggles Engage with no longpress function.
• Preset+Engage mode — the right footswitch cycles down to the previous preset in the Footswitch Recall list. A long-press of the right footswitch toggles Engage.
The LED illuminates to indicate when the pedal is engaged.
¶ Actuation
Each footswitch has an optional long-press function. If the long-press function is disabled, the function occurs when the footswitch is depressed. If the long-press function is enabled, the primary function occurs when the footswitch is released within 650 ms. Otherwise, the long-press function occurs after 650 ms.
If PRESET SWITCHING is set to Delayed, preset changes occur 1 second after the last press of the footswitch (see Preset Switching). See Right Footswitch under Global Setup for more information.
¶ SCREEN SAVER
To reduce OLED display burn-in, the brightness will reduce to 50% after 15 minutes and text will scroll after 1 hour with no activity.
¶ PRESETS & EDITING
ILLUMINE contains 50 user presets and 50 factory presets. After a factory reset, the user presets will be a copy of the factory presets.
Any of the 50 user presets may be edited and saved into any user preset number. The 50 factory presets may be edited, but must be saved into a user preset. In other words, the factory presets are always available, should you choose to use one as a starting point for a user preset.
A preset consists of the selections in the top-level menu, including the following:
• Preset name
• Effect and Effect Options
• 5 top-level parameters — Mix, 3 effect-dependent parameters, and Level
• If the preset will be recalled by the footswitch
• Expression settings — min/max parameters, skew, A/B transition times
If an Expression controller is active, two parameters — one for each end of the expression controller's range — are displayed and included in the preset. See Expression Control Engine for more information.
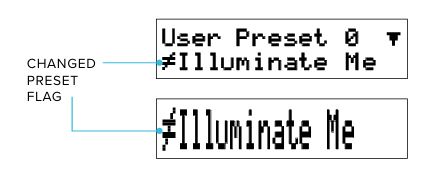
¶ CHANGED PRESET FLAG
If a preset is changed and not saved, a “≠” (not equal) character will appear before the preset name as a reminder to save the preset, if desired. You may navigate away from this preset without losing these changes. Only upon powering the unit off will these changes be lost, unless you save the preset.
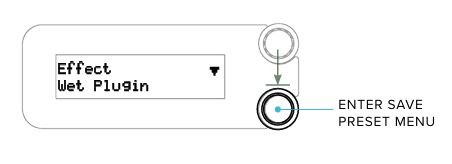
¶ SAVE MENU
From most screens in the top menu, pressing the bottom knob enters the SAVE PRESET menu.
If the preset has changed, “Yes” will be the default option; otherwise, “No” is the default option.

The SAVE PRESET menu options are as follows:
• Yes — save the preset now
• No — do nothing and exit
• Compare/Revert — the previously-saved preset may be heard when this option is showing, select to revert to these settings
• Save to (User Preset number) — do nothing to the current preset and save this preset to the Preset number indicated
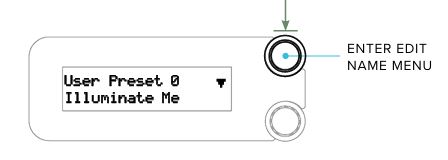
¶ EDIT THE PRESET NAME
On the PRESET screen, pressing the top knob enters the EDIT NAME menu:
• Turning the top knob selects the character to be changed
• Turning the bottom knob changes the character
• Pressing the top knob returns to the PRESET screen
• Pressing the bottom knob enters the SAVE PRESET menu
Preset names are limited to 14 characters in length.
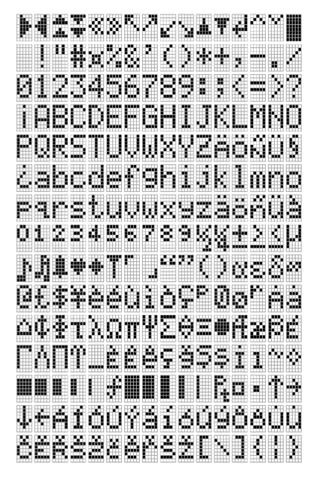
¶ Character Set
¶ FACTORY PRESETS
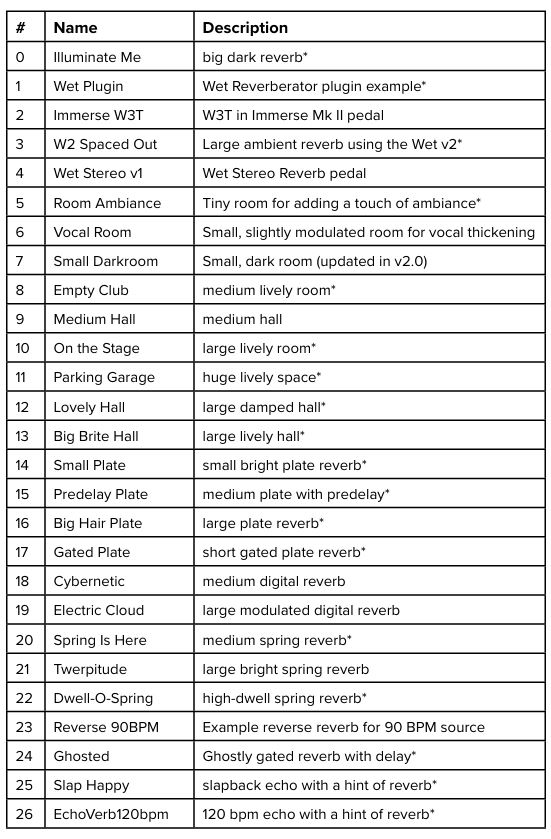
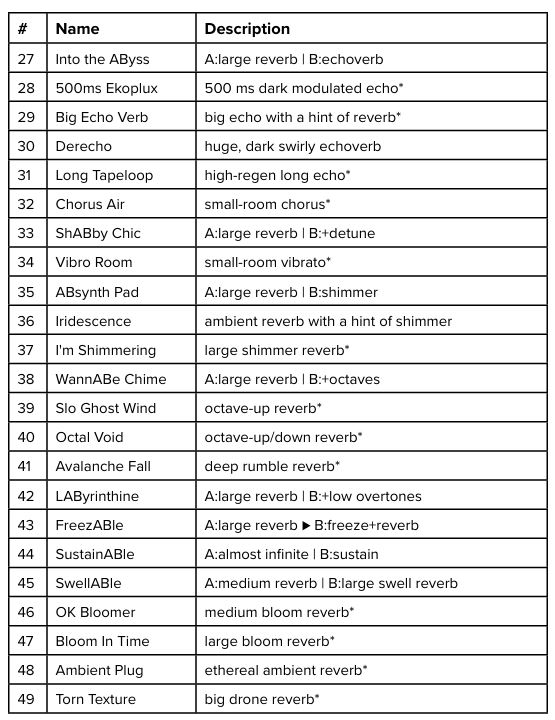
Factory Presets with an asterisk(*) were created by Drew Schlesinger, a professional synthesist, sound designer and composer. Drew's legacy of unique sound development started in the 1980's. He has worked with many leading effect and synthesizer manufacturers and created some extremely well known sounds. We are most grateful for Drew's contribution to ILLUMINE's presets. You can find more on Drew here.
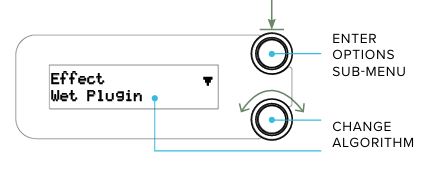
¶ Effect
Turning the bottom knob changes the algorithm used to create the reverberation effect.
Pressing the top knob enters the Options sub-menu, which allows for further tweaking of the algorithm.
Changing between presets that use the same Effect and Options will result in a seamless transition. However, when the Effect or Options are different between presets, changing between them will briefly mute the sound in the wet signal path only.
¶ The Reverb Effects
This algorithm matches the Neunaber Wet Reverberator software plugin as closely as possible given hardware constraints. The only significant difference from the plugin is that this version has fewer adjustable parameters.
The Wet Plugin reverb was designed to work well with a variety of instruments, but it really shines with voiced (non-percussive) instruments. Like all of the Wet Reverb algorithms, it is known for its open, natural sound, which complements the source signal without masking it.
The Wet v3 reverb was designed to work well with voiced instruments, in particular guitar and other stringed instruments. Like all of the Wet Reverb algorithms, it is known for its open, natural sound, which complements the source signal without masking it.
This is the same as the W3T reverb in the Immerse Mk II. It is the same core algorithm as the Wet Plugin, with different tone shaping and lower initial reflection density.
This version of the Wet Reverb was in the Immerse Mk I and in Expanse as “Wet Reboot.”
The FX In Level parameter is exclusively for expression control. FX In Level controls the input level to the wet signal path, which allows trails to persist when controlled by an expression pedal. If you do not have this parameter assigned to expression control, set it to 100%.
This is the original reverb from the Wet Stereo Reverb pedal. The Wet v1 reverb was designed to work well with stringed instruments and guitar, in particular. Like all of the Wet Reverb algorithms, it is known for its open, natural sound, which complements the source signal without masking it.
Room reverb is designed specifically to emulate a smaller acoustic space and is designed to have a wider stereo soundfield compared to our other reverbs. This reverb excels at adding natural ambience to a dry signal, thickening without a long reverb tail, and widening a mono signal. Due to its versatility, the Room reverb works well with all sound sources.
The Compression parameter affects only the reverb. Compressing the reverb on highly-dynamic signals allows louder sections to be more present (less effected) and can help to de-accentuate plosives in vocals.
Emulating the sound of a well-designed concert hall, this reverb is large and expansive. This is version 2 of our hall reverb algorithm. Hall reverbs sound great on a variety of audio sources, especially voiced instruments.
A studio plate reverb is a large, suspended metal plate connected with transducers at the input and output. It is known for its highly diffuse, metallic sound. This reverb has high input diffusion, giving it the dense, metallic quality of a studio plate. Plate reverbs work well on a variety of audio sources, especially percussive sounds.
Designed in the style of a vintage rack unit, this reverb sounds diffuse and synthetic, but not metallic like a plate. It sounds super spacey on synths.
A spring reverb consists of springs suspended between transducers, and its sound has a distinctive “twerp.” Try increasing the modulation rate for a classic vibrato-spring reverb sound. This is version 3 of our spring reverb algorithm.
This is our Plate reverb with infinite depth and gated by the input level. This effect works best on percussive sounds and may be used to artificially lengthen the sustain of the sound’s envelope.
The Time parameter determines how long the gate stays open after the input level has dropped below the threshold, which is based on the Sensitivity setting (see Options). The Release parameter determines how abruptly the gate closes.
Reverse reverb emulates the process of reversing the dry signal, processing it through a reverb, then re-reversing the signal. Instead of decaying, the reverb builds over the Tail Length time (in Effect Options).
The Rev Decay (reverse decay) parameter sets the time-reversed decay time of the reverb tail:
• Smaller values result in the reverb increasing more abruptly toward the end of the Tail Length time.
• Larger values result in less buildup. At 100%, the reverb tail is constant, similar to a gated reverb.
A delayed version of the dry signal may be added after the reverse reverb tail and is delayed by the Tail Length time. The Delayed Dry parameter adjusts the mix between the reverse reverb and delayed dry signal.
When reverse reverb is applied in real-time to a rhythmic signal, Tail Length may be calculated as 60,000 / BPM (round down).
Shimmer is a reverb effect reminiscent of a synth pad that follows what your instrument plays. This is version 2 of our shimmer reverb algorithm.
Rumble creates a low-frequency drone for a deep, cavernous reverb sound. It sounds neat on synths.
This effect combines the Wet v3 Reverb with a dual octave generator, one up and one down. Each octave is mixed with the original signal prior to the reverb in any proportion you desire.
This effect adds the Wet v3 Reverb and stereo echo. The Depth parameter controls both reverb and echo decay.
This effect adds the Wet v3 Reverb and a detune effect. Detune is an effect that pitch-transposes a signal slightly downward, which creates a thick, chorus-like effect without the warble of a traditional chorus.
This reverb is based on our Vintage Digital algorithm. It builds more slowly than a typical reverb. Increasing the Pre-Delay will delay the “bloom” even further.
This effect is typically used with the Mix set to 100%. If the Mix Sum Type is configured as Unity Dry, the Swell reverb effect may not operate as expected.
Swell reverb places a slow-attack, fast-release gate before a Wet v3 Reverb. This emulates placing a volume pedal before a reverb to swell in reverb pads. Playing a note or chord triggers the swell. Muting resets the swell, so it is ready for the next note or chord.
TIP: Increase the Sensitivity (see Options) if the swell does not trigger; decrease it if the swell does not reset between notes. Remember that you need to sufficiently mute the note to reset.
Infinite Hold combines the Wet v3 Reverb with a hold (“freeze”) function. The hold function captures and repeats a 100 ms loop, just enough for a single note or chord.
The hold is triggered by the Latch/Blend parameter, so you will need to use an expression controller — either the A/B Footswitch or an expression pedal.
With LATCH/BLEND at 0%, the hold is reset. Increasing from 0% latches the signal, looping it indefinitely. This parameter also sets the amount of the hold signal and reverb as follows:
• 0% Latch/Blend — 0% hold, 100% reverb
• 50% Latch/Blend — 50% hold, 50% reverb
• 100% Latch/Blend — 100% hold, 0% reverb
Set up your expression controller with one end of Latch/Blend at 0% and the other at the Blend value of your choice.
To use the Infinite Hold effect, start with your expression controller at 0%. Play the note or chord that you want to hold, then increase the expression controller to latch. When the hold is active, you may adjust the expression controller to finetune the blend between hold and reverb. To stop the hold and reset, return the expression controller to 0%.
Built on the Wet v3 Reverb, Sustain is a magical effect that can be configured as a sustain effect or virtually infinite reverb. What you play is recycled in an infinite loop during a hold phase, then decays out during a release phase.
TIP: Increase the Sensitivity (in Options) if the sustain effect does not trigger; decrease it if the sustain does not release when you want it to.
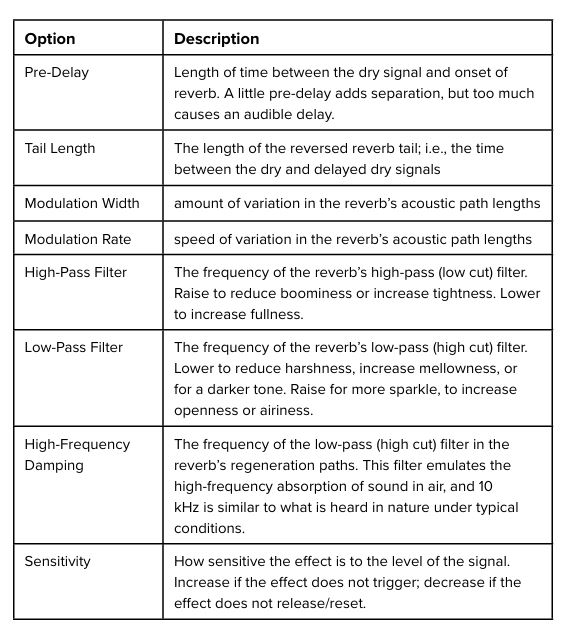
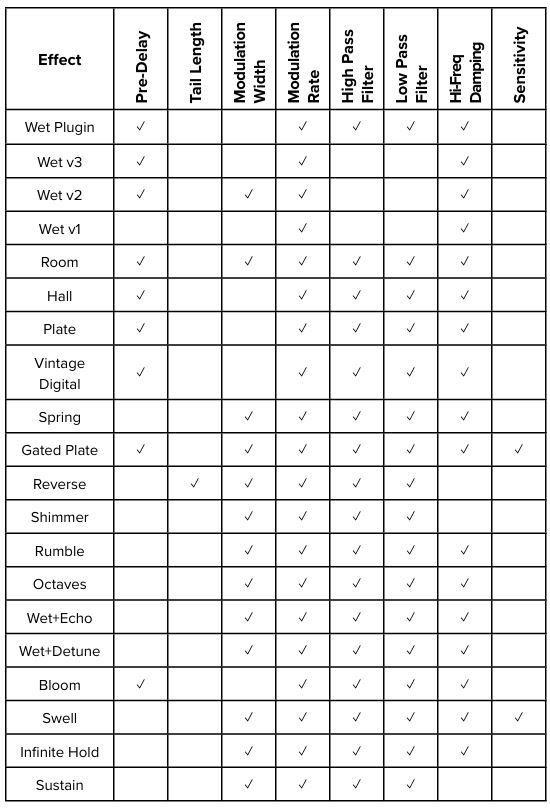
¶ Options
Options alter the algorithm itself, and as a result, the audio will mute briefly between changes. Not all Options are available for each Effect.
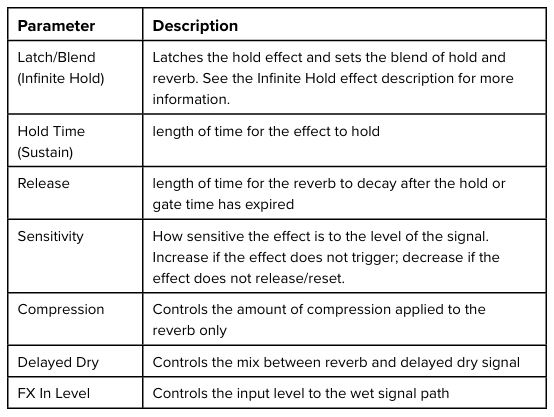
¶ PARAMETERS
Each preset has 5 parameters: Mix, Level, and 3 effect-dependent parameters. Turning the bottom knob while the parameter is displayed changes the parameter.

¶ Mix
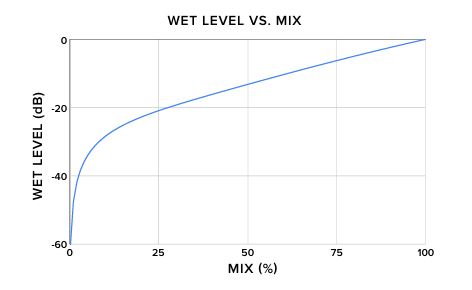
The MIX control changes the balance between the dry and wet (effect) signals.
The change in effect level is approximately linear in dB above 20%. Below 20%, the effect level accelerates downward, so that it is muted at 0%. How the Mix control affects the dry signal depends on the MIX SUM TYPE selection in the GLOBAL SETUP menu.
¶ Effect-Dependent Parameters

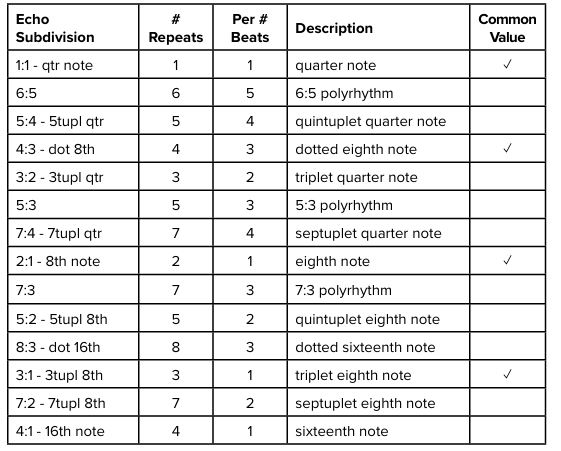
¶ Echo Subdivisions
When a MIDI beat clock is present, the echo time may be synchronized to the MIDI beat clock, or quarter note tempo. In this case, the Echo Time parameter changes to Echo Subdivision and specifies one of several divisions of the echo time that synchronize with the tempo:
¶ Level
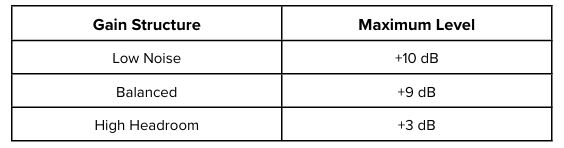
The LEVEL control allows the output level to be adjusted in 0.2 dB increments, from -10 dB to as much as +10 dB, depending on the GAIN STRUCTURE global setting.
¶ FOOTSWITCH RECALLS/SKIPS PRESET
This selection determines if a preset will be recalled when pressing the footswitch. Presets are recalled in order of preset number and will loop back around to the f irst after the last preset has been recalled.
Let’s say you select FOOTSWITCH Recalls Preset only on presets 1, 3 and 5. Pressing the ▲PRESET footswitch results in the presets being recalled as follows:
Preset 1 ⊲ Preset 3 ⊲ Preset 5 ⊲ Preset 1 ⊲ Preset 3 ⊲ Preset 5 ⊲ …
If you want presets to be recalled in a different order, then move the presets so that they are in numerical order using the Save to (preset #) option in the SAVE PRESET menu.
¶ SETUP MENUS
From the top-level menu, press the top button to enter the setup menu. Pressing the top button at any screen in the setup menu will return to the top-level menu.
In the A/B | EXP SETUP menu, pressing the bottom button at any screen will display the SAVE PRESET menu.
In the GLOBAL SETUP menu, pressing the bottom button has no effect EXCEPT when ▼ is displayed. In this case, pressing the bottom button performs the displayed action.
¶ EXPRESSION CONTROL ENGINE
ILLUMINE’s Expression Control Engine allows for up to five parameters to be controlled simultaneously by one controller. In addition, the trajectory along the controlled range, or “skew,” may be specified for each parameter. The number of parameters, ranges and skew of these controlled parameters is configurable by preset.
The Expression Control Engine accepts one of four inputs as a controller. This selection is global and applies to all presets:
- A/B Footswitch
- Expression Pedal
- Volume Pedal
- MIDI CC # (control change message)
¶ EXPRESSION CONTROLLER INPUTS
The expression controller input is selected from the EXP SOURCE screen in the GLOBAL SETUP Menu.
¶ A/B Footswitch
The A/B Footswitch selection allows for expression control without additional hardware. The A/B Footswitch is not a continuous controller; rather, it transitions between an “A” and “B” set of parameters over a selectable time period. This feature effectively doubles the number of presets.

The A/B Footswitch or other expression controller is required for the Infinite Hold effect, because it is used to switch the LATCH/MIX parameter, triggering the hold.
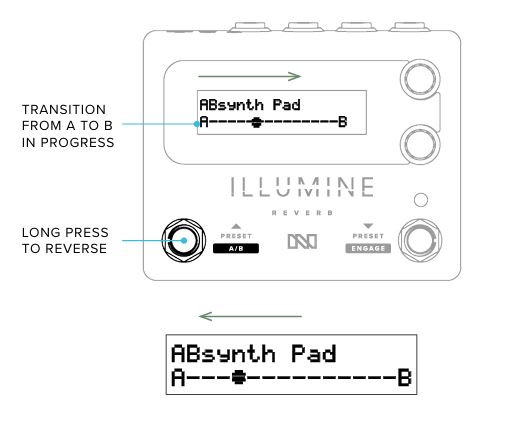
Long-press (hold for 650 ms) the A/B Footswitch to toggle between A and B parameter sets. A screen appears to show the current status of the transition.
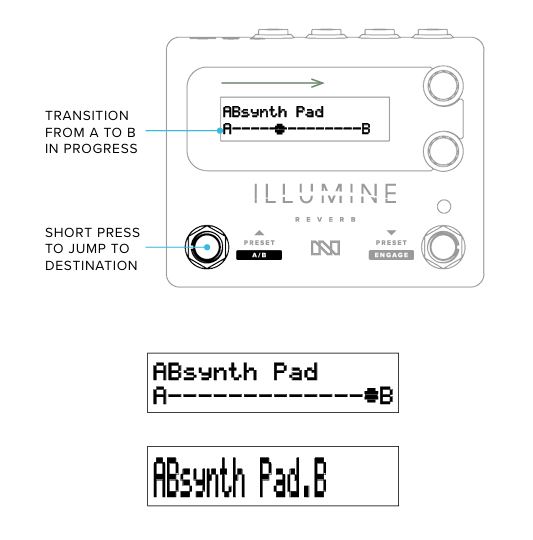
If the A/B Footswitch is long-pressed during a transition, the parameters will turn around and traverse a reverse path to the original state. If the A/B Footswitch is short-pressed during a transition, the parameters will jump to the destination state, effectively cancelling the transition period.
¶ Expression Pedal
An expression pedal with a TRS connector may be used as the expression controller. Connect the expression pedal via a TRS cable to the 3.5 mm EXP input. A 6.35 mm to 3.5 mm (¼” to ⅛”) adapter may be required.
¶ Volume Pedal
A passive (unpowered) volume pedal may be used as the expression controller. The resistance of the volume pedal is not critical. Use a 3.5 mm TRS to dual ¼” TS cable — also called an “insert” or “stereo breakout” cable — such as a Hosa CMP-153.
ILLUMINE will linearize the volume pedal’s sweep (see Setup).
¶ MIDI Control Change
MIDI control change message 11 (CC 11) may be used as the expression controller. This is particularly useful in the following cases:
• Controlling multiple parameters with a single MIDI CC message.
• Controlling multiple units from one expression controller. Configure the “control” unit as a MIDI Controller, EXP→MIDI CC OUT = Enabled , Channel 11. Connect the control unit’s MIDI OUT to slave’s MIDI IN. On the slave units, Select EXP SOURCE = MIDI CC 11.
¶ EXPRESSION CONTROLLER SETUP
First, select your controller type from the EXP SOURCE screen in the GLOBAL SETUP menu.
¶ Nomenclature
Naming may change based on the type of Exp Source.
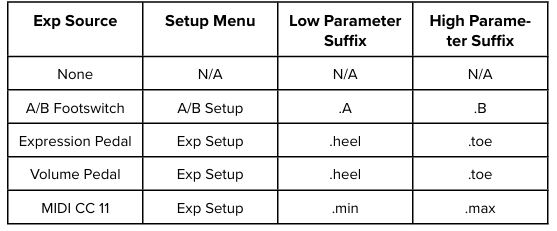
¶ A/B | EXP SETUP
In the top-level menu, navigate to the A/B SETUP or EXP SETUP menu (depending on which EXP SOURCE you selected).
Note that the settings in the A/B | EXP SETUP menu may be different for each preset, whereas the EXP SOURCE selection applies to all presets.
¶ ADDING PARAMETERS TO EXPRESSION CONTROL
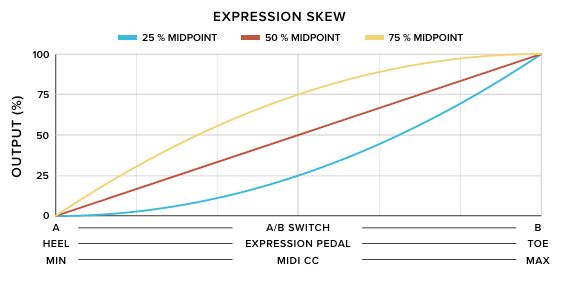
In the A/B | EXP SETUP menu, you may select which of the 5 preset parameters are controlled by the expression controller. In addition, you may select the “skew” of the control:
• Off — expression controller does not change the parameter
• 25% Midpoint 25% Midpoint — expression controller controls parameter, the midpoint of the controller range maps to 25% of the range between minimum and maximum
• 50% Midpoint — expression controller controls parameter, the midpoint of the controller range maps to 50% of the range between minimum and maximum
• 75% Midpoint — expression controller controls parameter, the midpoint of the controller range maps to 75% of the range between minimum and maximum
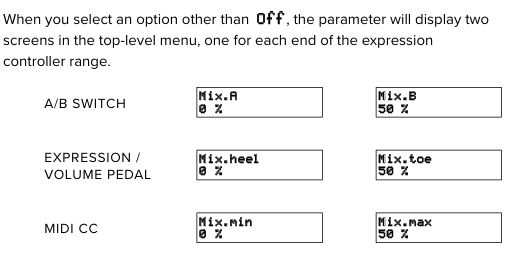
When you select an option other than Off, the parameter will display two screens in the top-level menu, one for each end of the expression controller range.
¶ SELECTING THE MIDPOINT
If you are using an expression or volume pedal controller…
- Start with 50% Midpoint.
- Go to the top-level menu and set your two parameter values to define the range.
- Return to the EXP SETUP menu, and listen to the 3 different skew options while you sweep the controller.
- Select the option that most closely matches how you want this parameter to sound while sweeping the controller.
- Repeat for each controlled parameter.
If you are using the A/B Footswitch…
- Set the A⊲B TIME and A⊳B TIME to a convenient value such as 4.0 s.
- Start with 50% Midpoint.
- Go to the top-level menu and set your two parameter values to define the range.
- Activate the A/B Footswitch and listen to the transition.
- If the A/B transition sounds like too much of the change occurs in the first second, change the skew to 25% Midpoint.
- If the A/B transition sounds like too much of the change occurs in the last second, change the skew to 75% Midpoint.
- Repeat for each controlled parameter.
- When finished, set the A⊲B TIME and A⊳B TIME to the desired values.
¶ A⊲B AND A⊳B TIME
These screens allow you to select the transition times between A and B parameters in each direction. Values are limited to approximate factors-of-2 between 0.5 s and 60 s. These screens are only available when using the A/B switch as the expression controller.
¶ MIDI
MIDI is accessible via two 2.5 mm TRS connectors. Adapter cables may be required.
Select the MIDI channel under GLOBAL SETUP ⊲ MIDI CHANNEL. The MIDI channel applies to both receive and transmit if MIDI Controller mode is selected.
¶ MIDI IN
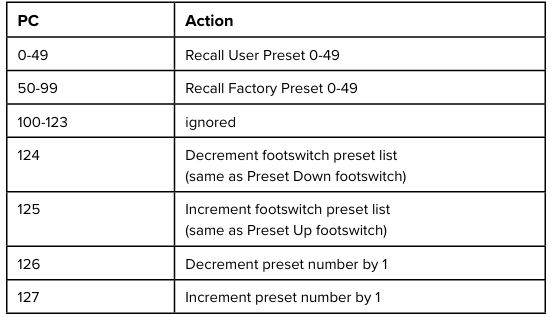
¶ Program Change (PC)
PC messages recall presets according to the following table:
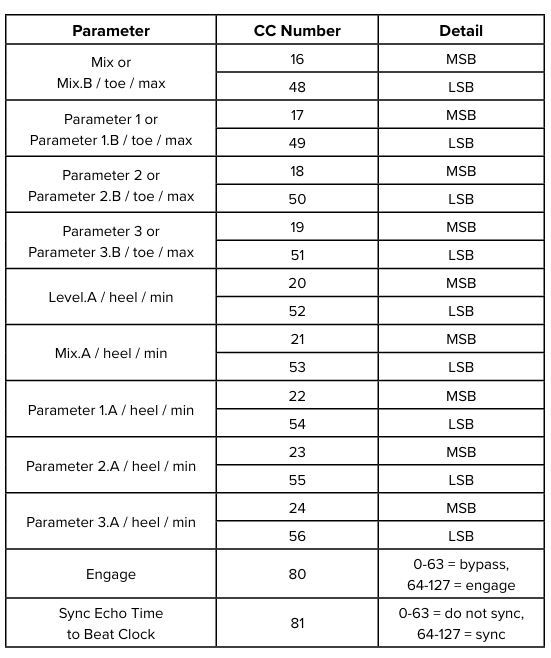
¶ Control Change (CC)
Two-byte CC values are accepted (MSB and LSB). The LSB is not required. Parameters 1, 2 and 3 are defined under “Effect-Dependent Parameters.”
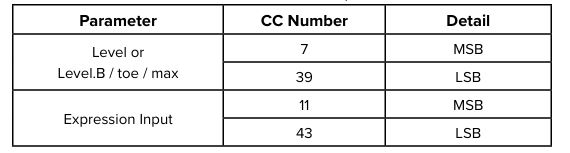
¶ Level Controllers
The level controller range is limited.
- Minimum = 27
- Maximum depends on the Gain Structure selection:
- Low Noise = 127
- Balanced = 122
- High Headroom = 92
The Level in dB, 𝑥, may be set by sending controller value = (5𝑥)+77.
¶ MIDI OUT/THRU
The MIDI OUT/THRU connector may function as one of two modes, depending on the selection under GLOBAL SETUP ⊲ MIDI OUT.
• THRU mode — MIDI IN is echoed to MIDI OUT/THRU.
• Controller mode — ILLUMINE functions as a simple MIDI controller.
¶ MIDI THRU Mode
Messages received on MIDI IN are echoed on MIDI OUT/THRU. There is no latency between IN and OUT/THRU. Use this mode to daisy-chain multiple devices with an external MIDI controller.
¶ MIDI Controller Mode
ILLUMINE functions as a simple MIDI controller, sending Program Change (PC) and Control Change (CC) messages on MIDI OUT/THRU.
A MIDI PC message is sent only when the preset is changed via the footswitch. The PC number will correspond to the preset number recalled.
MIDI CC messages corresponding to the value of the expression controller may also be sent. This function is enabled and the CC number set as follows:
• GLOBAL SETUP ⊲ EXP→MIDI CC OUT = Enabled
• GLOBAL SETUP ⊲ EXP→MIDI CC # = CC number to transmit
If CC number 0-31 is selected, the value is sent as 2 bytes: MSB on the selected CC number and LSB on CC number + 32. For any other CC number, the value will be sent as 1 byte only.
Although Controller mode would not typically be used with an external controller, MIDI IN messages will be processed but not echoed to MIDI OUT/THRU.
¶ MIDI BEAT CLOCK
ILLUMINE can synchronize the echo time for the Wet+Echo effect to a MIDI beat clock. The usable range of beat clock synchronization is approximately 23-230 BPM (beats per minute).
The current beat clock frequency is displayed in GLOBAL SETUP ⊲ MIDI BEAT CLK RX. This screen displays the status of the MIDI beat clock received at the MIDI Input:
• BPM (beats per minute) — if a beat clock is received
• “none” — if no beat clock is received
• “too slow” — if the BPM is below the usable limit
Beat clock synchronization is enabled on power up. To ignore the beat clock and use the preset echo time instead, use CC 81 (see table above).
Because the echo time in the Wet+Echo effect is limited, BPMs lower than 88 may require the echo time to be divided to remain synchronized. If the subdivided echo time is greater than the maximum echo time, it will be divided by 2 or by 4 and the Echo Subdivision parameter will be displayed with the suffix “double time” or “quad time,” respectively.
¶ GLOBAL SETUP
Global Parameters are automatically saved after exiting the Global Setup menu.
¶ EXP SOURCE
See Expression Control Engine section.
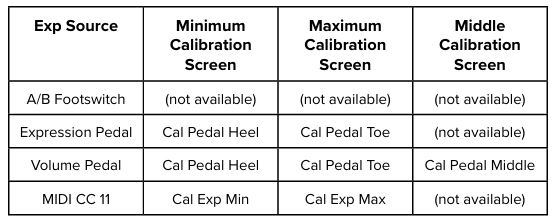
¶ CAL PEDAL / EXP SCREENS
These screens allow you to calibrate the minimum and maximum values of an expression controller when an expression pedal, volume pedal or MIDI controller is selected as the expression source.
When these screens are first displayed, they will show the calibration value. Once the expression source is changed, they will show the actual expression value.
In addition, the calibration value may be adjusted using the bottom knob. This is useful in the following situations:
• To add a “dead zone” to ensure that the full extent of the controlled parameter is reached
• To set the range of a MIDI or LFO (low-frequency oscillator) controller
Press the bottom knob to set the calibration value.
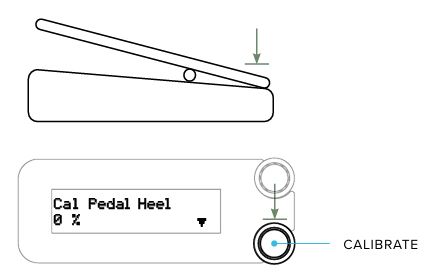
¶ Cal Pedal Heel / Exp Min
This screen allows you to calibrate the minimum or “heel down” setting on the expression pedal to 0%. To perform the calibration, set the expression pedal to the heel down position and press the bottom knob.
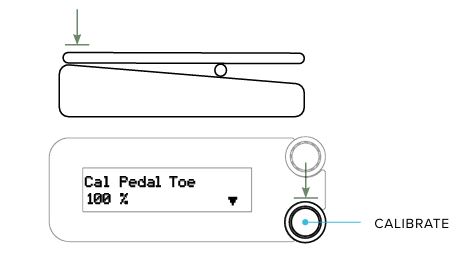
¶ Cal Pedal Toe / Exp Max
This screen allows you to calibrate the maximum or “toe down” setting on the expression pedal to 100%. To perform the calibration, set the expression pedal to the toe down position and press the bottom knob.
¶ Cal Pedal Middle
Volume pedals typically have an audio-taper sweep, which changes slowly in the lower portion of the sweep, then quickly in the upper portion. ILLUMINE will compensate for this sweep, making it appear like a linear expression pedal. This screen allows you to calibrate the middle point of the sweep for a more accurate conversion.
If your volume pedal has a selection switch for the taper: set the treadle to the middle position and select the switch position that results in the higher expression value on the screen.
By default, ILLUMINE is calibrated for an Ernie Ball VP-JR with the taper switch in the up position.
There are two methods to calibrate your pedal:
• Easy but less accurate — set the volume pedal’s treadle to the halfway point between heel down and toe down. Press the bottom knob.
• Difficult but more accurate — slowly sweep the volume pedal while watching the change in expression value. You will notice a breakpoint at which the value changes accelerate. This value is typically around 15-25%. Set the treadle to this breakpoint and press the bottom knob.
¶ MIDI SETUP
See the MIDI section for details.
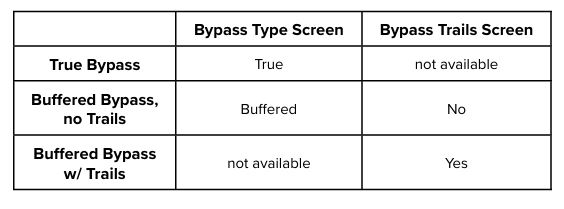
¶ BYPASS TYPE & TRAILS
There are 3 bypass options:
• True bypass — entire circuit is bypassed using relays
• Buffered bypass without trails — signal is buffered when bypassed, and the reverb tail cuts off when bypassed
• Buffered bypass with trails — signal is buffered when bypassed, and the reverb trail persists when bypassed
True Bypass and Trails are mutually exclusive. You must select BYPASS TYPE = Buffered to enable the BYPASS TRAILS screen, or you must select BYPASS TRAILS = No to enable the BYPASS TYPE screen.
In addition, true bypass and parallel loop mode are mutually exclusive. You must selct BYPASS TYPE = Buffered Buffered to enable the EFFECT LOOP TYPE screen, and you must select EFFECT LOOP TYPE = Serial to enable the BYPASS TYPE screen.
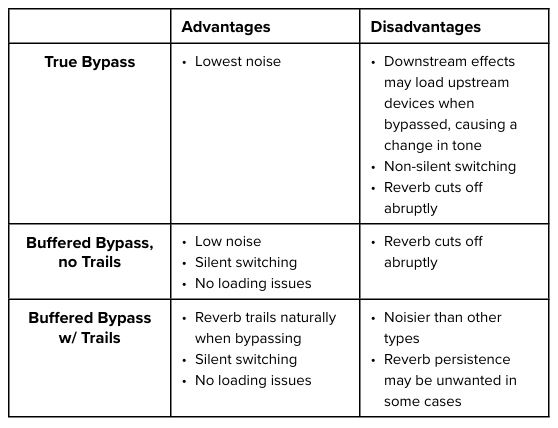
¶ Attributes of Bypass Types
¶ EFFECT ROUTING
This selects the routing of the dry and effect signals.
• Stereo Mix — Stereo effect is mixed with the input(s). For a mono output, a mono effect is mixed with the input(s).
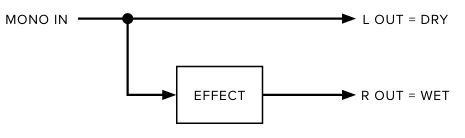
• Separate Wet/Dry — Dry signal is sent to the left output and Wet signal to the right output. The effect signal is generated from an input sum according to the FX SIDECHAIN IN global setting. This setting has two options as described by WET/DRY MODE below.
¶ EFFECT LOOP TYPE
This menu selects the type of effects loop in which ILLUMINE is installed. It is displayed only when EFFECT ROUTING = Stereo Mix.
• Serial — a serial effects loop or serial signal chain. This is the most common configuration.
• Parallel — a parallel effects loop or sidechain: a signal path that is split from the main signal path, processed with effects, then summed back into the main signal path. This setting is equivalent to “Kill Dry” on other Neunaber products. If chaining more than one effect processor in a parallel loop, select Serial instead.
IMPORTANT- The Parallel option is available only when BYPASS TYPE is Buffered, because true bypass defeats ILLUMINE’s ability to mute the dry signal when bypassed. When BYPASS TYPE is True, the EFFECT LOOP TYPE menu is not displayed and defaults to Serial.
¶ Which Type of Effect Loop Do I Have?
Pedalboards: effects in a single mono or stereo chain after the instrument is a serial configuration.
Amps/preamps: an effects loop that is not explicitly labeled is typically a serial loop. Parallel effects loops are explicitly labeled as such.
Mixers: an auxiliary bus or effects send/return is a parallel configuration. A channel insert is a serial configuration.
¶ How to Set Up Multiple Effects in a Parallel Loop
The Parallel setting does not pass the dry signal to other effects in the local chain, which will reduce the number of effect layers. Instead, use the Serial setting and follow this procedure to minimize the dry signal through the effects loop:
• Set your loop's return level fairly high (you want to really hear the effects) and all your effects to the even wet/dry mix point. This may or may not be 50% on the Mix knob — check the effect's User Guide if you're not sure where this is.
• For the effect that you want to be the most prominent, leave it's Mix knob at the even wet/dry mix point.
• For effects that you want lower in the mix, lower their Mix knobs. Here you want to listen for relative effect level. This is the level of each effect relative to one another, not to the dry signal.
• Once your relative effect levels are fairly close, reduce the loop return level to balance the overall effect level with the dry signal.
• At this point, you can tweak your effects' Mix levels, but remember to leave the most prominent effect at the even wet/dry mix point.
Note: this procedure will not work if any effect in the parallel chain digitizes the dry signal (the dry signal for each effect must be analog).
¶ WET/DRY MODE
This menu selects the signal flow configuration for Wet/Dry Effect Routing. It is displayed only when EFFECT ROUTING = Separate Wet/Dry.
• Multiple Effects — ILLUMINE is part of a signal chain with multiple effects in the wet signal path. Connect the dry input to ILLUMINE’s left input and wet input to ILLUMINE’s right input. The left/dry channel will not have the effect added, while a mono effect is added to the right/wet channel.
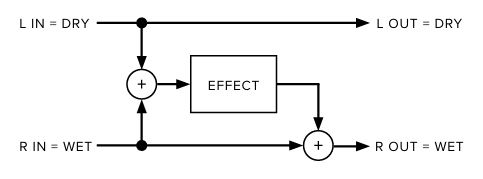
• ILLUMINE Only — ILLUMINE is the only effect in the wet signal chain and will create a wet/dry output from a dry input. The mono/dry input is sent to the left output, and the wet signal is sent to the right output.
IMPORTANT- The ILLUMINE Only ILLUMINE Only option is available only when BYPASS TYPE is Buffered, because true bypass will pass the dry signal through the wet channel. When BYPASS TYPE is True, the WET/DRY MODE menu is not displayed and defaults to Multiple Effects.
¶ RIGHT FOOTSWITCH
There are 2 options for the function of the right-side footswitch:
• Is Engage — footswitch is engage only
• Preset+Engage — footswitch is preset down on short-press, engage on long-press
TIP: You may want to use Is Engage if you are using only a few presets or a MIDI controller. If, however, you recall many presets from ILLUMINE’s footswitches and/or rarely, if ever, bypass the pedal, Preset+Engage may work better for you.
¶ PRESET SWITCHING
This option determines when a preset change occurs after turning the knob or pressing a footswitch. Preset changes via MIDI always occur immediately.
• Immediate — the change occurs immediately
• Knob/Long Press — a change occurs only after pressing a knob or long-pressing a footswitch (see below)
• Delayed — a change occurs 1 second after you stop turning the knob or pressing the footswitch, allowing you to scroll without changing to every intermediate preset
¶ Knob/Long Press Option
When changing the preset, the display will blink to indicate that the change is pending. If the original preset is re-selected, blinking will stop and the pending change is cancelled.
Pressing either knob or long-pressing the Preset footswitch will load the selected preset. You may long-press the right-side footswitch only if it is configured as Preset+Engage.
Since this option adds a secondary long-press function to the Preset footswitch, changes will occur upon switch release
¶ MIX SUM TYPE
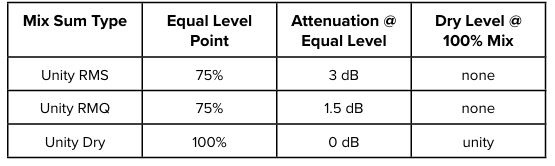
This option determines how the reverb and dry signals are summed as the Mix control changes.
• Unity RMS — Dry and effect levels are summed so that the RMS (rootmean-square) equals 1. This works well for signals with a fairly constant level, such as synthesizers and distorted guitar.
• Unity RMQ — Dry and effect levels are summed so that the RMQ (rootmean-quad) equals 1. This works well for highly dynamic signals, such as uncompressed, clean electric guitar or acoustic guitar.
• Unity Dry — The level of the dry signal does not change.
Comparison of Mix Sum Types
The Swell reverb effect is typically configured with 100% Mix (no dry signal). If the MIX SUM TYPE is configured as Unity Dry, the Swell reverb effect may not operate as expected.
¶ GAIN STRUCTURE
This selection allows you to optimize ILLUMINE’s gain structure for your system. Proper gain structure allows the signal level to be as high as possible to minimize noise but also avoid distortion.
• Low Noise — Designed for low instrument-level signals, such as a guitar with its volume control turned down with no level boost before ILLUMINE.
• Balanced — Designed for typical instrument-level signals, such as a guitar with passive pickups, guitar volume at full and no electronic boost before ILLUMINE.
• High Headroom — Designed for high instrument-level or line level signals. If you hear distortion when using other settings, or if the reverberated signal sounds compressed or attenuated, choose this setting.
As with all audio electronic devices, there is a tradeoff between noise and headroom. Increasing headroom also increases noise, and reducing noise also reduces headroom.
The Gain Structure selection also limits the maximum Level control.
¶ FX SIDECHAIN IN
The input to the effect processor sidechain blends the two input signals. Most users should leave this setting at its default value of Balanced Mix, which works well in the vast majority of cases.
This setting should only be changed if the input is stereo and not monocompatible — in other words, summing the stereo input signal causes full or partial cancellation of the signal. In rare cases, we encounter an effect pedal or processor that produces a mono-incompatible stereo signal. If you are unlucky enough to encounter such an abomination, we encourage you to immediately pull it from your signal chain and chuck it into a wood chipper. Seriously though, if you must leave this device in your signal chain, we allow for a few ways to mitigate this issue:
• Unbalanced Mix — a compromise that reduces the issues caused by mono-incompatible signals while still allowing partial mixing of the inputs
• Left Only — derive the effect from only the left input signal
• Right Only — derive the effect from only the right input signal
These settings do not repair the original signal’s problem, they only reduce or eliminate its effect on ILLUMINE.
DESIGNER’S NOTE: Good practice and common sense dictates that effect designers and sound engineers create audio that is mono-compatible, which means that the stereo signal may be summed to mono without any unwanted issues. Sometimes a stereo signal may be reproduced as mono due to system or venue limitations. Even with stereo playback through co-located speakers, there will be some acoustic summing. Just think about how many little Bluetooth speakers are either mono or co-located stereo. Therefore, it is of paramount importance for audio professionals to ensure that stereo signals are mono-compatible.
¶ NOISE REDUCTION
Most of the effects in ILLUMINE have built-in noise reduction, which is highly transparent in most cases. We strongly encourage you to set this to “On.”
If the level of your input signal is very low, you may notice the effect of the noise reduction as a periodic absence or cut off of the effect signal. In this case, you should first change the GAIN STRUCTURE setting to Low Noise. If this does not alleviate the issue, then you may turn the NOISE REDUCTION = Off. Note, however, that this may increase the noise level of the system.
¶ USER INTERFACE OPTIONS
¶ OLED Brightness
This setting determines the brightness of the OLED display.
¶ LED Brightness
This setting determines the brightness of the Engage LED.
¶ Text Display
This setting selects whether the text is displayed as left-justified or centered.

¶ Show % Values As
This setting selects whether percent values are displayed as numerical text or a horizontal bar.

¶ Power Supply Voltage
There is no adjustment on this screen; it simply displays the power supply voltage for informational or diagnostic purposes. The voltage should be between 9.0 V and 12.0 V for proper operation.
If at any time the power supply voltage exceeds 13.0 V, a warning screen will be displayed. You will not be able to dismiss this warning until the issue is resolved.
¶ Reset Parameters
Two screens allow you to reset the global and/or preset parameters to factory defaults:
• RESET ALL GLOBAL PARAMETERS — reset all global (non-preset) parameters to factory defaults
• RESET ALL PRESET PARAMETERS — reset all presets to factory default settings
To perform a full factory reset, reset both global and preset parameters.
¶ PRESET MANAGER SOFTWARE
ILLUMINE Preset Manager software for Windows and macOS is available at neunaber.net. A USB-MIDI adapter is required to use the software.
This software allows you to manage your presets as follows:
• Import/export single presets
• Backup/restore all presets and global configuration settings
• Rename presets
• View preset parameters and global configuration settings
ILLUMINE Preset Manager does not allow editing of preset parameters, except for the preset name.
¶ USER INTERFACE
All active parameters for the currently-selected preset are displayed. Inactive parameters are not shown.
Export Preset — Exports the currently selected preset to a file.
Import Preset — Imports a single preset into the one currently selected.
Backup — Creates a backup file of all presets and global parameters.
Restore — Restores all presets and global parameters from a backup file.
About — Shows software/firmware version and global parameters.
Preset Selector— Selects the current preset.
Preset Name — Displays the name of the selected preset. Editing this field will overwrite the name of the preset in ILLUMINE. Only the first 14 characters are accepted. Only the following characters can be translated between ILLUMINE and Preset Manager software, and all others will be ignored:
a b c d e f g h i j k l m n o p q r s t u v w x y z
A B C D E F G H I J K L M N O P Q R S T U V W X Y Z
" ! # $ % & ' ( ) * + , - . / : ; < = > ? 0 1 2 3 4 5 6 7 8 9
¶ UPDATING ILLUMINE’S FIRMWARE
You will need a USB-MIDI interface and a macOS or Windows PC. Visit neunaber.net for a list of recommended USB-MIDI interfaces. The use of any other USB-MIDI interface is not recommended.
Connect the USB-MIDI interface directly to ILLUMINE, using the 2.5mm adapters included with ILLUMINE.
Power up your ILLUMINE Reverb.
Download ILLUMINE Preset Manager software and extract it from the .zip file. Close all other applications, then open ILLUMINE Preset Manager software. Do NOT run Preset Manager from within the .zip file.
Select your USB-MIDI interface from the Interface dropdown box and click Connect.
Click the About button. If a firmware update is available, the Update Firmware button will appear at the bottom. Click it. Confirm that you wish to proceed by clicking Yes when prompted to continue.
The firmware update process will automatically backup and restore your presets and settings. It will leave a copy of the backup file on your desktop.
Wait for the Success message. Click OK. The firmware update is now complete.
¶ TROUBLESHOOTING
¶ Problem
An error occurred during the firmware update.
¶ Solution
Use one of the USB-MIDI interfaces recommended at www.quilterlabs.com.
Connect directly to ILLUMINE with no other MIDI devices in the chain.
If possible, connect the USB-MIDI interface directly to your computer, not to a USB hub.
Launch Preset Manager Software, wait for it to detect that the prior attempt failed, then repeat the firmware update. The software will attempt to restore your previous backup if possible.
If Preset Manager does not automatically detect that the prior attempt failed, you may manually restart the firmware update as follows:
• Ensure Preset Manager has focus by clicking on the ILLUMINE Preset Manager logo.
• Press option-command-u (macOS) or Ctrl-Alt-u (Windows)
¶ Problem
Preset Manager Software cannot connect to ILLUMINE to start the update, despite being able to connect previously.
¶ Solution
If your ILLUMINE appears to be operating properly, then check the following:
• Is your USB-MIDI interface connected to your computer and ILLUMINE?
• Is your USB-MIDI interface connected OUT to MIDI IN and IN to MIDI OUT?
• Is ILLUMINE powered on?
If ILLUMINE is not operating properly, then you may perform the following recovery procedure in firmware version 1.0.2 or later. This procedure will erase all of your User Presets and Global Settings.
• Close Preset Manager Software.
• Remove the power plug from ILLUMINE.
• Hold down the top knob and right-side footswitch while reinserting the power plug. The display should remain blank.
• Connect a USB-MIDI interface between ILLUMINE and your computer.
• Relaunch Preset Manager Software and click Connect.
• When the Cannot Connect window appears, click Update Firmware.
• After the update is complete, you will need to restore your settings from a previous backup file.
If you have firmware version 1.0.1 or earlier, please contact Neunaber Support.
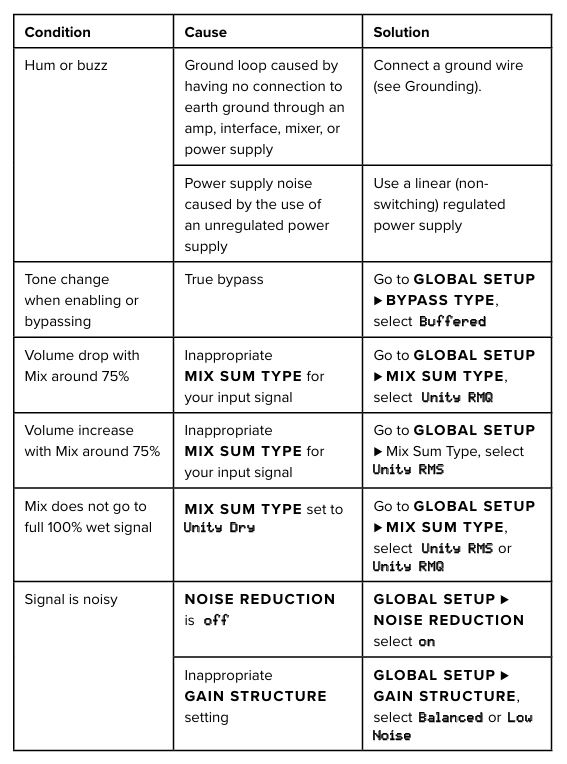
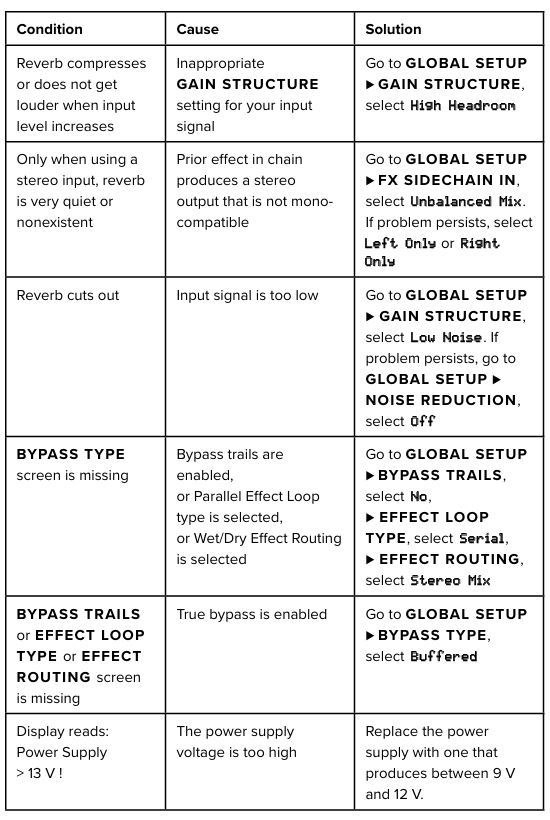
¶ TROUBLESHOOTING GUIDE
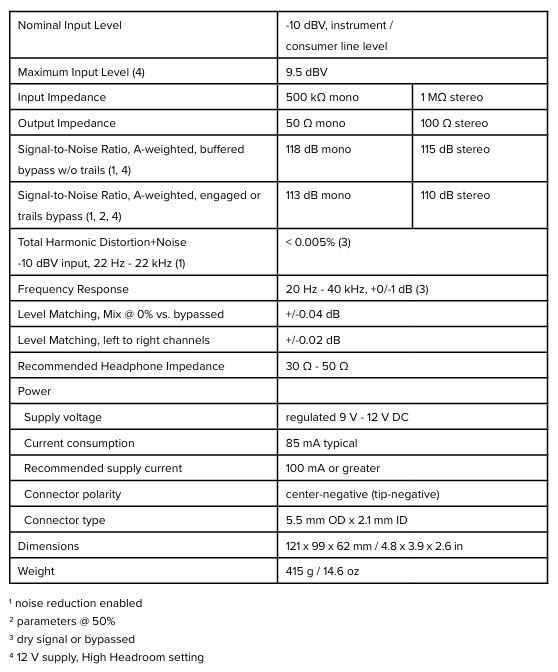
¶ SPECIFICATIONS
At Neunaber, we love to see what you do with your ‘toys’. We encourage you to tag us in your posts, pictures & videos featuring your Neunaber gear. To stay connected, go ahead and follow us on the channels seen below. We can’t wait to see what you do!
This product contains no user-serviceable parts.
This device complies with part 15 of the FCC Rules. Operation is subject to the following two conditions: (1) This device may not cause harmful interference, and (2) this device must accept any interference received, including interference that may cause undesired operation.
¶ WARRANTY & SERVICE:
For warranty and service information, visit our support website at support.quilterlabs.com
¶ LEGAL
© 2021-2022 Neunaber Technology LLC. All Rights Reserved.
Neunaber®, ILLUMINE™ and Wet™ are trademarks of Neunaber Technology LLC. All other trademarks are the property of their respective owners.
Some reverb algorithms are protected by US Patent #8204240 and China Patent #CN101689840B.