¶ The Quilter Interbass
¶ IMPORTANT SAFETY INSTRUCTIONS
1 – Read and keep these instructions.
2 – Heed all warnings and follow all instructions.
3 – WARNING: To prevent fire or electric shock, do not expose this equipment to rain or moisture. Do not use this apparatus near water.
4 – Clean only with a dry cloth.
5 – WARNING: To prevent excessive temperature rise, operate product only in free air with unrestricted ventilation. Do not install in confined spaces or near heat sources such as radiators, heat registers, stoves, or other apparatus that produce heat.
6 – Do not defeat the safety purpose of the polarized or grounding-type plug. A polarized plug has two blades with one wider than the other. A grounding type plug has two blades and a grounding prong. The wide blade or third prong are provided for your safety. If the provided plug does not fit your outlet, consult an electrician for the replacement of the obsolete outlet.
7 – Protect the power cord from being walked on or pinched, particularly plugs, convenience receptacles, and the point where they exit from the apparatus.
8 – Unplug the apparatus during lightning storms or when unused for long periods of time.
9 – The appliance coupler (or attachment plug) is the mains disconnect device and should remain readily accessible when amplifier is in use.
10 – Refer all servicing to qualified service personnel. Servicing is required when the apparatus has been damaged in any way, such as power-supply cord or plug is damaged, liquid has been spilled or objects have fallen into the apparatus, the apparatus has been exposed to rain or moisture, does not operate normally, or has been dropped.
11 – This device complies with Part 15 of the FCC Rules. Operation is subject to the following two conditions: (1) this device may not cause harmful interference, and (2) this device must accept any interference received, including interference that may cause undesired operation.
12 – Changes or modifications made by the user that are not expressly approved by the manufacturer may void your authority to operate the amplifier.
CAUTION: TO REDUCE THE RISK OF ELECTRIC SHOCK, DO NOT REMOVE THE COVER. NO USER-SERVICEABLE PARTS INSIDE. REFER SERVICING TO QUALIFIED PERSONNEL.
WARNING: To prevent fire or electric shock, do not expose this equipment to rain or moisture.
¶ Welcome to the INTERBASS: Micro size, big feature package
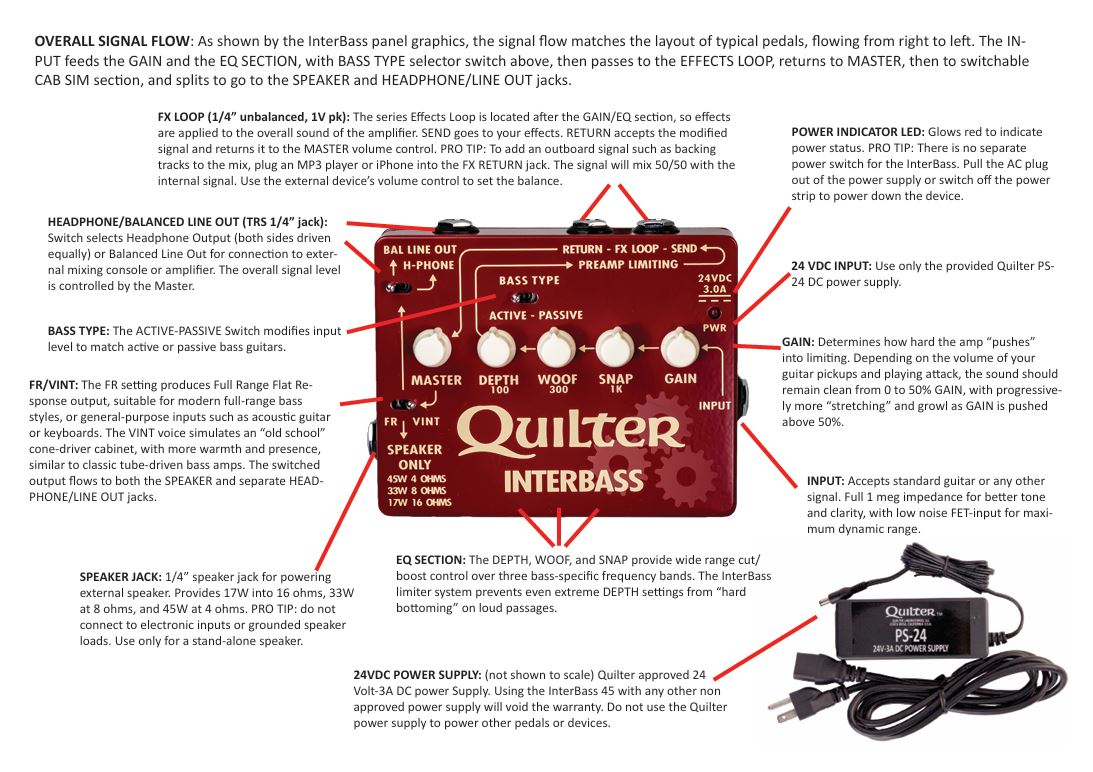
The InterBass provides all the key requirements for coupling both electric bass, stand up bass, or other electronic instrument to a PA or recording console, and also contains a built-in amp with enough power for practice or small gigs. It combines a full-service bass-guitar preamp, limiter section, effects loop, cabinet simulator, headphone driver, and 45-watt power amp in a single pedal-size enclosure. As the name suggests, it provides a complete interface between your instrument, your pedals, your DAW, your PA system, or a stand-alone loudspeaker, with lots of flexibility to handle whatever you may come across in your efforts as a performing artist. In spite of its diminutive size, this little powerhouse packs a potent punch capable of driving a serious stageworthy rig.
The high impedance INPUT accepts normal guitar cables. The GAINcontrol ranges from clean to musically pleasing “growl”. The three band EQ adjusts DEPTH(100 Hz), WOOF(300 Hz), and HIGH(1kHz) frequencies, with two selectable BASS TYPE modes. ACTIVE sets the input level correctly for basses with active electronics, and the PASSIVE mode sets the input level for passive bass pickups. A full featured FX LOOP includes a secret “audio input” feature, allowing an auxiliary music source to be
“injected” into the FX RETURN, which further expands the capabilities of the InterBass. The MASTER control adjusts the peak limiting threshold from 0 to 45 watts offering clean headroom and/or rich sustain at will. The MASTER CONTROL feeds the FR/VINT switch, and dual signal paths lead to the BAL LINE OUT/HEAPHONE jack, and the SPEAKER OUTPUT jack, which drives any normal speaker, and is stable with no speaker connected.
Please consult the rest of this manual to obtain the best results from all these features.
¶ A NOTE FROM PAT QUILTER:
Our goal at Quilter Labs is to bring you all the tone and dynamics of the best vintage amplifiers without the weight and drawbacks of tube technology. Despite its small size, this is a fully professional product, produced on a world-class production line. May your new amplifier deliver many years of faithful service and become a source of inspiration and creativity.
¶ Specifications
| Amplifier Module Specifications | |
| Power Req.: | 24 Volts DC (see power supply below) |
| Power Output: | 17 Watts @ 16 Ohms 33 Watts @ 8 Ohms 45 Watts @ 4 Ohms |
| Input Impedance: | 1MΩ |
| Fuse: | None (non user-serviceable) |
| FX Loop: | 1 Volt full scale unbalanced Output impedance 1kΩ, input impedance 47kΩ. |
| XLR Out: | Balanced, 600ohms, -6db. Ground lift switch |
| HEADPHONE OUT: | 3 Volts peak, 39Ω |
| DIMENSIONS | |
| H x W x D: | |
| Weight: | Total shipping weight: 1.98 lbs, 0.9 kg InterBass weight: 11.1 oz, 0.32 kg AC Adaptor weight: 15.8 oz, 0.45 kg |
| Power Supply: | 24 Volts 3 Amps, 72 Watts Height (1.25”, 32mm) Width (2”, 50mm) Length (5”, 125mm {Strain relief adds .5”,12mm}) DC cable (60”, 1.5 meters) 5.5 x 2.5mm Barrel connector (Adaptor weight, 2 Pounds) |
¶ Troubleshooting
| Symptom | Action |
| NO SIGNAL/LOW SIGNAL | If the amber InterBlock power light is on, confirm that the Gain, Master and instrument volumes are turned up, and confirm that input, effects loop, and speaker cables are all good. Try an alternate speaker, and try the headphones to see if signal is getting through. If the green power supply LED is on, but not the Interblock, confirm that the connection from power supply to InterBlock is fully seated. If the green power supply LED is off, confirm that the AC power is plugged in. If so, unplug the power supply from the InterBlock. If the green LED comes on, the InterBlock may be bad. If the greed LED stays off the power supply may be bad. Contact Quilter Labs for service instruction. If the sound from the InterBlock remains weak and garbled, it may need servicing. |
| HUM AND NOISE | Hum and buzz are chronic problems with electronic instrument hookups. To track down the source, reduce guitar volume to zero. If the hum clears up, it is coming from the guitar. Guitar hum is frequently affected by where you position yourself, and often increases when not touching the strings. If the hum remains, unplug the guitar cable from the InterBlock. If this fixes the hum, try another cable. If hum remains after unplugging the input, unplug any devices connected to the Effects Loop. If this fixes the hum, the problem is in the pedal board. Gently wiggle all cables, listening for any fluctuation in hum level. Solderless cables often go bad after a year or two. If cables are good, confirm that the pedalboard power supply is not overloaded, which can also cause hum.If the hum remains with nothing plugged into the input or effects loop, the problem may be a ground loop between the InterBlock and outboard console. If possible, operate from the same AC strip, and if necessary, insert a ground-lift Direct Box between the Line Out and console Line In. |
| LOUD SCREECHING NOISES | Be sure the speaker output is only connected to a stand-alone speaker (or left unplugged). Accidentally connecting the speaker to a signal input will often cause runaway feedback. |
| HEADPHONE | If sound only comes from one side, confirm that the selector switch is set on H-PHONE and that the plug is fully inserted. |
¶ WARRANTY & SERVICE:
For warranty and service information, visit our support website at support.quilterlabs.com
¶ FCC NOTICE:
Note: This equipment has been tested and found to comply with the limits for a Class B digital device, pursuant to part 15 of the FCC Rules. These limits are designed to provide reasonable protection against harmful interference in a residential installation. This equipment generates, uses, and can radiate radio frequency energy and, if not installed and used in accordance with the instructions, may cause harmful interference to radio communications. However, there is no guarantee that interference will not occur in a particular installation. If this equipment does cause harmful interference to radio or television reception, which can be determined by turning the equipment off and on, the user is encouraged to try to correct the interference by one or more of the following measures:
• Reorient or relocate the receiving antenna.
• Increase the separation between the equipment and receiver
• Connect the product into an outlet on a circuit different from that to which the receiver is connected.
• Consult the dealer or an experienced radio/TV technician for help.